Foodlify: Documentation
restaurant food menu app for Shopify
email: developers@solvercircle.comPowered by SolverCircle
Foodify - Restaurant Food Menu for Shopify app is the faster and easier way to order food menu from your online store for the customers.
Just go to Foodify (or your created custom page) Page, choose food products, quantity and click on the order button to add the group of food products to their shopping basket. It is the simple way to order various food items in a few seconds. This app helps you to sell more and it is best for wholesale buyers.
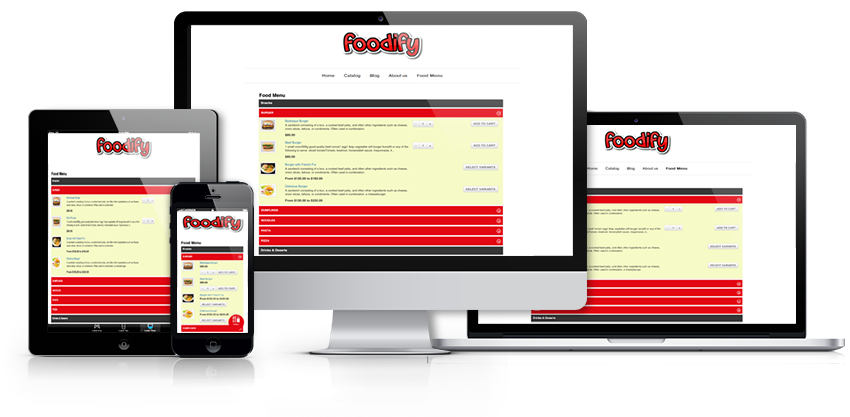
Foodify - Restaurant Food Menu for Shopify app is fully responsive and includes additional features like dynamic text, color, design and settings to enhance the user experience.
Foodify - Restaurant Food Menu for Shopify app is a full-featured and customizable quick order solution that can simply be added to any shopify store. It is very flexible and compatible with many existing app in the Shopify repository. User can easily setup and configure the app into the new or existing Shopify stores.
- Easier and Faster way to order from online shop for the customers.
- Fully responsive for any device.
- Best app for wholesale buyers.
- Accordion view.
- Add to cart multi products in one single page with nice effect.
- View the total currency in shopping basket at same page.
- Show Name, Image, Price, Quantity and Description.
- Products image preview available with description.
Please follow the steps below to install and setup the Foodlify app
Step #1
First of all, Need to Enable App embeds from Theme Customize

Step #2
Go to Foodlify App:
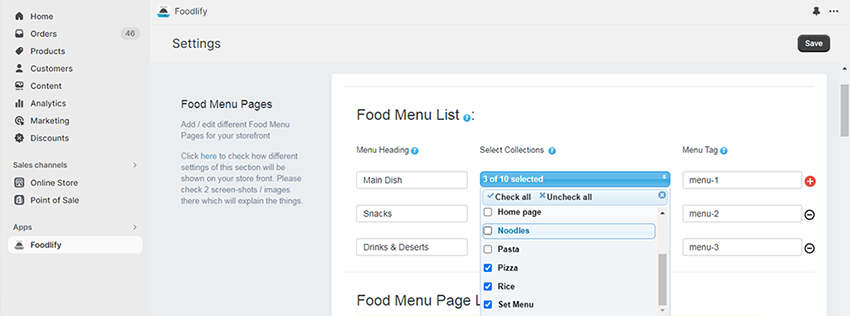
In Food Menu List Section: Enter Menu Heading (i.e Starter, Main Courses, Desserts etc). Then Select Food Collections (As shown in the screenshot). After that Menu Tag will be created automatically.
For these settings, the front will look like this ↓

Step #3
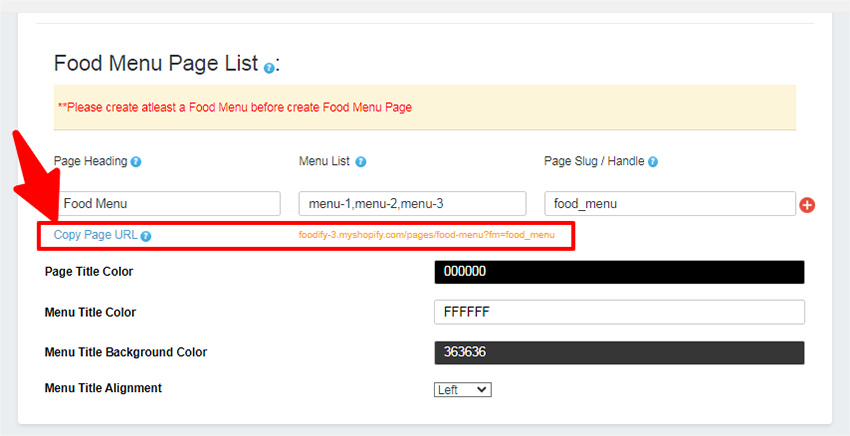
In Food Menu Page List section: Enter Page Heading, Then Enter Comma Separated Menu Tag from Food Menu List section (You will find Menu Tag in the above section). Finally Enter Page Slug / Handle (It should be friendly URL or Handle and Please do not put any space before or after the URL).

For these settings, the front will look like this ↓

Step #4
In the rest of the sections like Accordion Settings, Mini Cart Icon and Product delivery option, you can change the color or image according to your own preferences.

After complete the above steps, press the save button.
Step #5
Process of displaying Food Menu link in Storefront (This is important step, Please do it carefully)
To show the Food Menu to your storefront, you need to link it.
So Copy Page URL from Food Menu Page List section then paste it as a Navigation link in your store. (Please see the screenshot ↓)
Now go to your stores Navigation section (Go to Online Store > Navigation > Menus > Main menu). Then click on Add menu item ↓

Insert Food Menu Name then Paste the link which you copied from Food Menu Page List section. Click Add then Save menu ↓

Finally check it in your Storefront. That’s all.