Looking for the best Business Card Design app in Shopify but finding most online app too overpriced and not getting the benefits as you imagined? Most other online app can feel so overpriced with so limited benefits. Continuous searching makes it tough to get what you are actually looking for. Sometimes it feels you'll never the app you are looking for. But you can get something different where you have more chance to get exactly what you are looking for in online app. So it feels less like an overpriced and lack of benefits online app and more like a real solution you are looking for with Shopify Business Card Design app because you will get the most benefits also in cheapest price.
And now you can easily use amazing Shopify Business Card Design Apps for free. If you have any questions that are beyond the scope of this help file, please feel free to email via our user page contact form to get everything you need. Thank you so much!
What is "Business Card Design" and Why should you Buy it?
Shopify Custom Business Card Design app is a shopify module which is used to easily design or customized business card.
Customers are instantly able to design their own card and this is easy way to design from online. Just click a button and select or upload icon then add text to any position of the card.
By this powerful app customer can design the business card as per their need such as add name, designation, address, contact details etc. by different types of Color, Font, Size and Formats.
User can upload Logo or Images in the card and also change the front and back Background of Business Card. User can upload multiple images and drag the image and text on different positions.
Customer can Add to Cart the card with custom price. Shop owner can pre design the business card from admin panel and set it to the frontend.
Shopify Custom Business Card Design app has some excellent features and easy to setup. This app is more flexible and compatible with many existing apps in the Shopify repository. This app is fully customizable. Users can easily configure the app into the new or existing shopify store.
Why Should You Use It?
Instantly Upload Image:
Your customers can instantly upload their own background image for front and back side of the business card.
Add Text, Logo and Images:
Your customers can easily add Name, Designation, Address, Contact Details, Logo and Images for both front and back side of the business card.
Change Text Properties:
Your customers can also change Text Font, Font Size, Alignment, Font Weight, Line Height, Text Underline, Text Italic and Text Color.
What Benefits you will get by using the Premium Version?
Shoppers can upload their own ClipArt/Design/Image/Logo to print on product while shopping.
Just click on “Design It” button and start design.
Add any Text or Clip-Art on the product and place or move at any position of the card.
Change Text Size, Color, Font, Bold, Italic and Underline.
Add multiple texts.
Drag, Resize and Move the Text or Logo.
Shoppers can Add to Cart the product from here.
Shoppers can view the “Preview Design Image” from cart page.
What are the Admin Benefits you will get by using the Premium Version?
Shop owner can upload front and back image of business card from “Manage Products” Tab admin. Shop owner can pre design the card and set it to the frontend.
Shop owner can customize the Design It button according to his store’s theme from “Appearance Settings”.
Shop owner can view the “Documentation” and “Tutorial” from “Installation Instruction” Tab.
Shop owner can set which product should customize or personalize.
Show the “Customized Image”, “Additional Image” and “Text Details” in Admin Order Details Page.
Shop owner can also Print and Download the Card Design from Order Details page.
What are the Extra Benefits you will get by using the Gold Version?
All Benefits of premium version with included . . .
Text or logo Lock/Unlock option.
Text or Image can be Swapped.
Undo/Redo option.
Text alignment option.
Unlimited text fonts upload with enable/disable option.
Enable/Disable options for advanced control, background upload, clipart upload and add more text.
Installation and Admin Settings Video
Please follow the video instruction for installation & admin settings.
How you should Install this App?
This app requires few theme liquid file changes. The changes depend on theme liquid codes. If you understand liquid logic / codes then follow the steps given below and let us know if you face any problems. Otherwise add install@solvercircle.com as a staff member of your store (If you don't know how to add "staff member" then click here) and email us at install@solvercircle.com, then we will install the codes for you.
1. Login your Shopify Store in Admin panel.
2. Now hit our App URL and click on to "Get App" button.
For show this application in your theme, you should add some code in your template. So total process are given below.
3. Go to “Themes” menu of Admin Dashboard and Edit your published themes to install the application.
4. Click on “Template Editor” and put the Shopify Business Card Design Application “Code” on the following files. (Update this template files: product.liquid and cart.liquid)
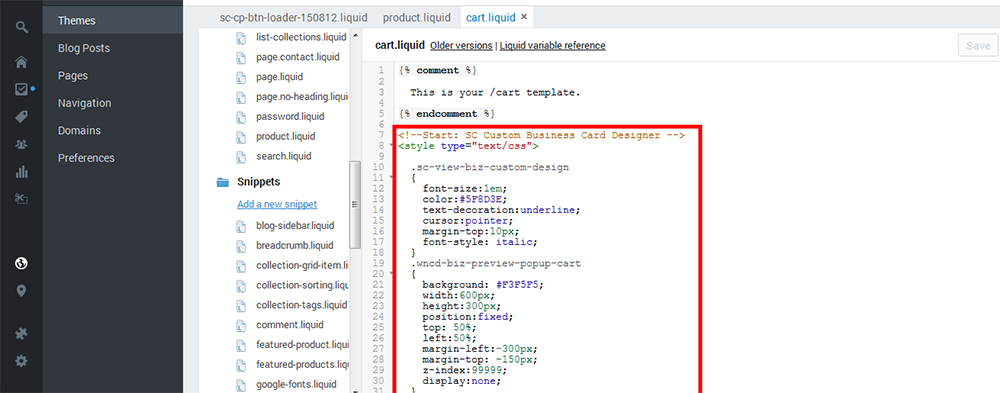
Step 1: Add the following code just after “Add to Cart” button code in product.liquid file. Please check the screenshot below. If you can't find 'Add to Cart' button code in product.liquid then check under Snippets folder. Some themes add product page content under liquid file (like product-form.liquid etc.) in Snippets folder.
Screenshots of theme file for the Step 1 code is given below:
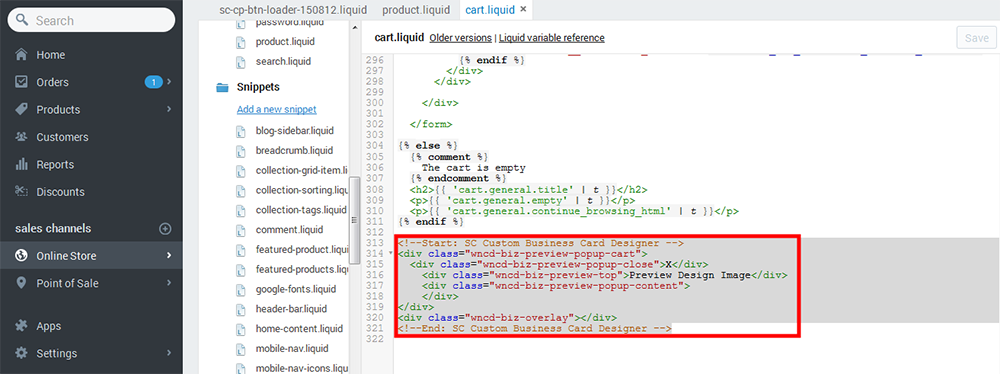
Step 2 (a): Add the following CSS and JavaScript code in the beginning of cart.liquid file. These codes are for showing Popup in the Cart page’s “View Custom Design” link.
Screenshots of theme file for the Step 2 (c) code is given below:
5. So your application has installed. Now go to “Apps” menu of Admin Dashboard and click on the “Business Card Design” Apps link.
6. Now go to “Manage Products” tab. Here you will see all the products. In the right side you will find “Add Customization” options. Upload Front and Back Image of Business Card and click on “Add Customization” button. After click on the button you will see “Design It” button. You can pre design the business card from here.
7. Click on next tab “Appearance Settings” in the right top corner to customize your “Design It” button.
8. For more Information or Documentation go to “Installation Instructions” menu.
How to Manage Products from Admin?
How does the Admins Manage Products Design Preview Look?
How does the Admins Appearance Settings Look?
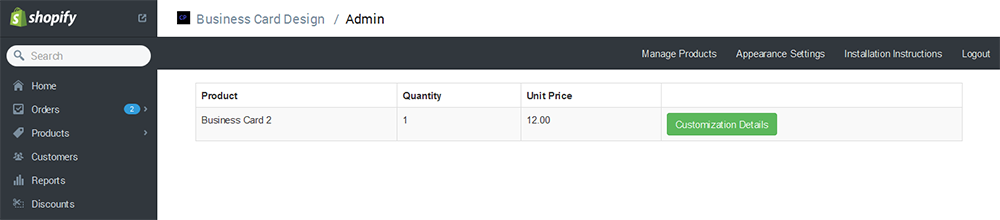
How does the Admins Order Page Look?
How does the Admins Order Details Page Look?
How does the Frontend's "Design It" Button Look?
How does the Frontend's Horizontal Design Look?
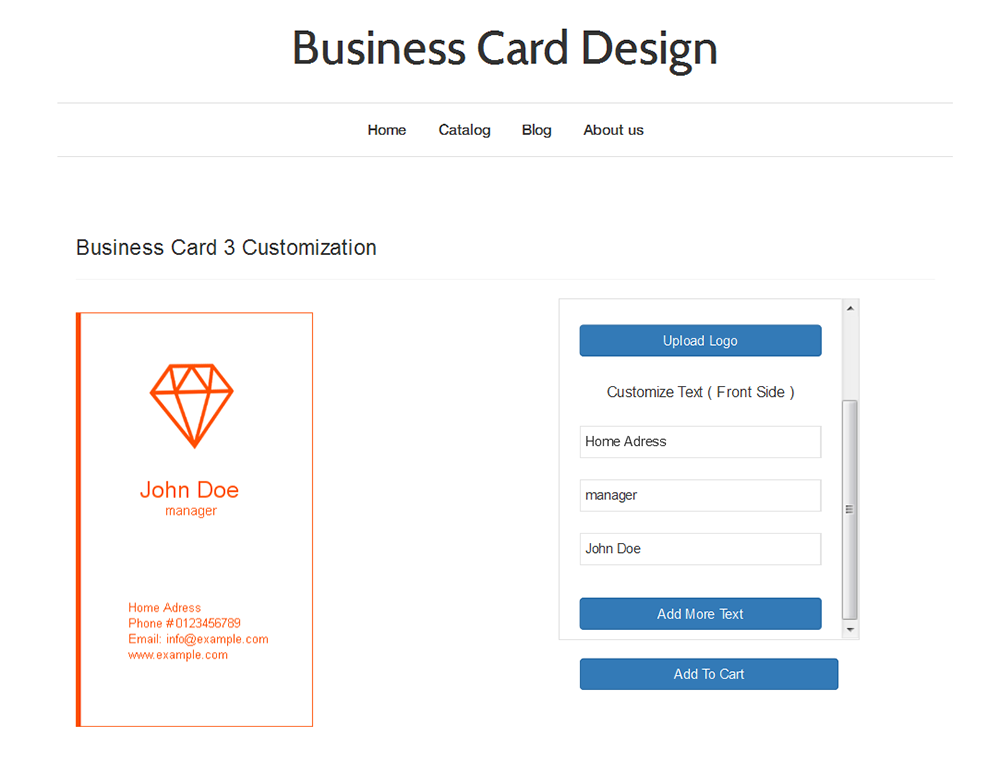
How does the Frontend's Vertical Design Look?
How does the Frontend's Cart Page Look?
How does the Frontend's Cart Page Design Preview Look?