
This app requires few theme liquid file changes. The changes depend on theme liquid codes. If you understand liquid logic / codes then follow the steps given below and let us know if you face any problems. Otherwise add install@solvercircle.com as a staff member of your store (If you don't know how to add "staff member" then click here) and email us at install@solvercircle.com, then we will install the codes for you.
You can directly download the "Custom Product Design Studio" apps integrated Narrative Theme from here. Just install the integrated theme and no need to add any code installation.
1. Login your Shopify Store in Admin panel.
2. Now hit our Apps URL and click on to "Get App" button.
For show this apps in Narrative theme, you should add some code in your template. So total process are given below.
3. Go to “Themes” menu of Admin Dashboard and Edit Narrative themes to install the app.
4. Click on “Template Editor” and follow the below steps to put the Custom Product Design Studio App “Code” on the following files.
Step 1: Go to "theme.liquid" file under the "Layout" folder, Add the following code in the end of this file (before the body tag) like as below screenshot.
	<!--SC Custom Product Design -->
	  <style type="text/css">
	  .sc-cart-img
	  {
		width:100px !important;
	  }
	  </style>
Please see the following screenshot for clean overview:

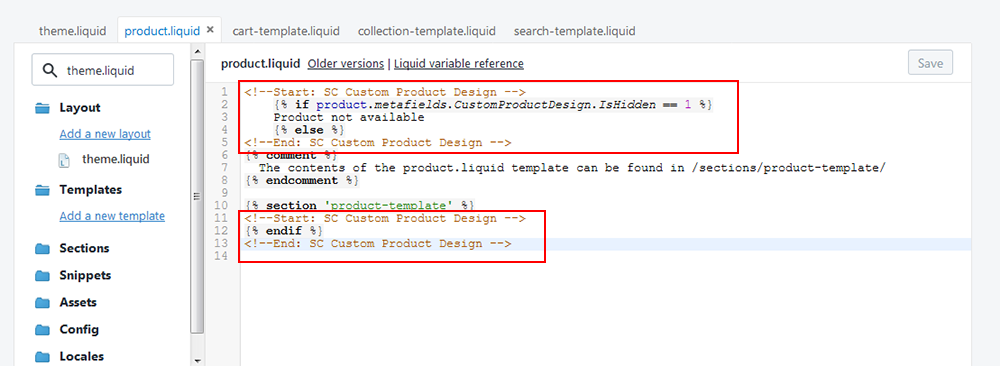
Step 2: Go to "product.liquid" file under the "Templates" folder, Add the following code in a very begining of this file and complete the code with "{% endif %}" like as below screenshot
	<!--Start: SC Custom Product Design -->
		{% if product.metafields.CustomProductDesign.IsHidden == 1 %}
		Product not available
		{% else %}
	<!--End: SC Custom Product Design -->
	<!--Start: SC Custom Product Design -->
	{% endif %}
	<!--End: SC Custom Product Design -->
Please see the following screenshot for clean overview:
Step 3: Go to "cart-template.liquid" file under the "Sections" folder, Add the following code just after this code <tr class="cart-item{% if item == 'template' %} ajax-cart__template{% endif %}" data-cart-item data-cart-item-id="{{ item.key }}"> like as below screenshot.
<!--SC Custom Product Design -->
{% if item.variant.metafields.CustomProductDesign.CPID %}
<td class="cart-item__image-wrapper">
{% assign itemImage = true %}
{% if item.image == blank and item.product.featured_image == blank %}
{% assign itemImage = false %}
{% endif %}
{% if item.variant.metafields.CustomProductDesign.FrontImage %}
<a href="{{ item.variant.metafields.CustomProductDesign.FrontImage}}">
<img class="sc-cart-img" src="{{ item.variant.metafields.CustomProductDesign.FrontImage}}"
style="width:100px;" alt="{{ item.title | escape }}" />
</a>
{% endif %}
{% if item.variant.metafields.CustomProductDesign.BackImage %}
<a href="{{ item.variant.metafields.CustomProductDesign.BackImage}}">
<img class="sc-cart-img" src="{{ item.variant.metafields.CustomProductDesign.BackImage}}"
style="width:100px;" alt="{{ item.title | escape }}" />
</a>
{% endif %}
</td>
<td class="cart-item__meta small--text-left">
<a class="cart-item__meta-title h4" href="{{ item.variant.metafields.CustomProductDesign.Product_URL }}&ex_cp_id={{ item.variant.metafields.CustomProductDesign.CPID }}&ex_v_id={{ item.variant.id }}" data-cart-item-href data-cart-item-title>{{ item.title }}</a>
<p class="small--hide">
<a href="/cart/change?line={{ forloop.index }}&quantity=0" class="btn btn--small btn--clear btn--primary-color cart-item__remove" data-cart-item-delete>{{ 'cart.general.remove' | t }}</a>
</p>
<p class="cart-item__message" data-item-message></p>
</td>
{% else %}
<!-- ALL existing line item rows will go here CODES GOES HERE. -->
Please see the following screenshot for clean overview:

Step 4: Go to "collection-template.liquid" file under the "Sections" folder, Add the following code just after this code {% for product in collection.products %} like as below screenshot.
        <!--SC Custom Product Design -->
          {% if product.metafields.CustomProductDesign.IsHidden == 1 %}
          {% else %}
Please see the following screenshot for clean overview:

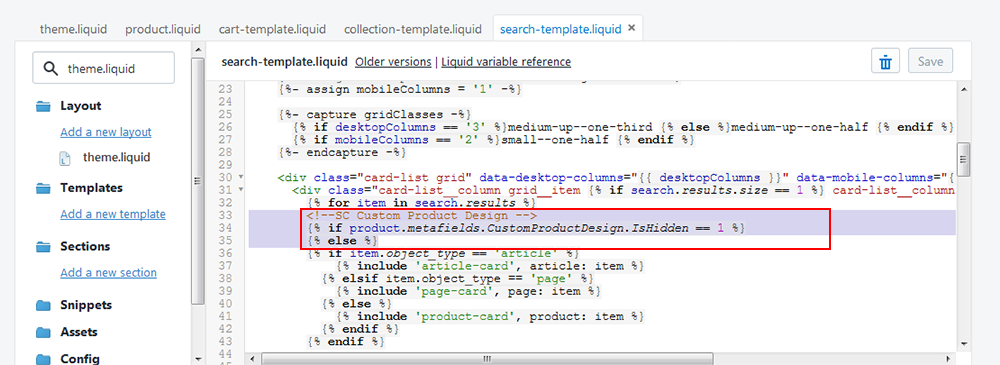
Step 5: Go to "search-template.liquid" file under the "Sections" folder, Add the following code just after this code {% for item in search.results %} like as below screenshot.
	<!--SC Custom Product Design -->
	{% if item.metafields.CustomProductDesign.IsHidden == 1 %}
	{% else %}
Please see the following screenshot for clean overview:
5. So your application has installed. Now go to “Apps” menu of Admin Dashboard and click on the “Custom Product Design” Apps link.
6. Now click on “Appearance Settings” menu in the right top corner to customize your Design Toolbox.
7. Go to the next tab “Manage Product.” Here you will see all the product. In the right side you will find “Customization Settings” options. Just set the “Customization Price” and Upload Front and Back Image or only front image to show on the Frontend Design view.
8. Now go to “Manage Logos” menu. Click on “Add Files” link and select Image/Icon/Clip-Art files. You can select single or multiple items. After select files, click on the “Start Upload” button and all items will be upload simultaneously. You can “Cancel Upload” and Delete single/selected/all items at a time from this panel.
9. For more Information or Documentation go to “Help” menu.