
1. Login your Shopify Store in Admin panel.
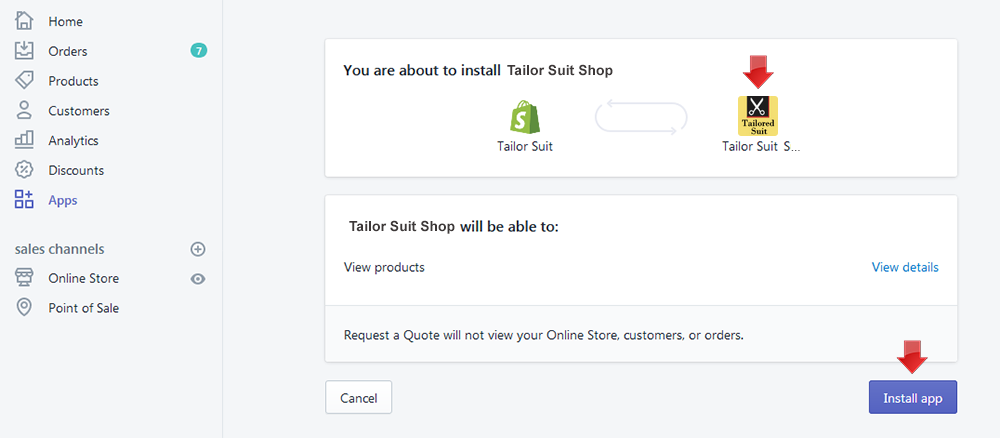
2. Now hit our App URL https://apps.shopify.com/tailor-suit-shop and click to Get button. A popup will be appear then enter your store's URL and click to "Login" button. After click on login button you will view the following page. Now click on "Install App" button and your app will be install. Now check the app in Admin's "Apps" section.
To show this App in your theme, you need to add some codes in your published theme. So total process are given below...
If you are not familiar with liquid code changes or need any sort of help then just add install@solvercircle.com as a staff member of your store (If you don't know how to add "staff member" then click here), email us to explain the problems and we will fix the issues for you.
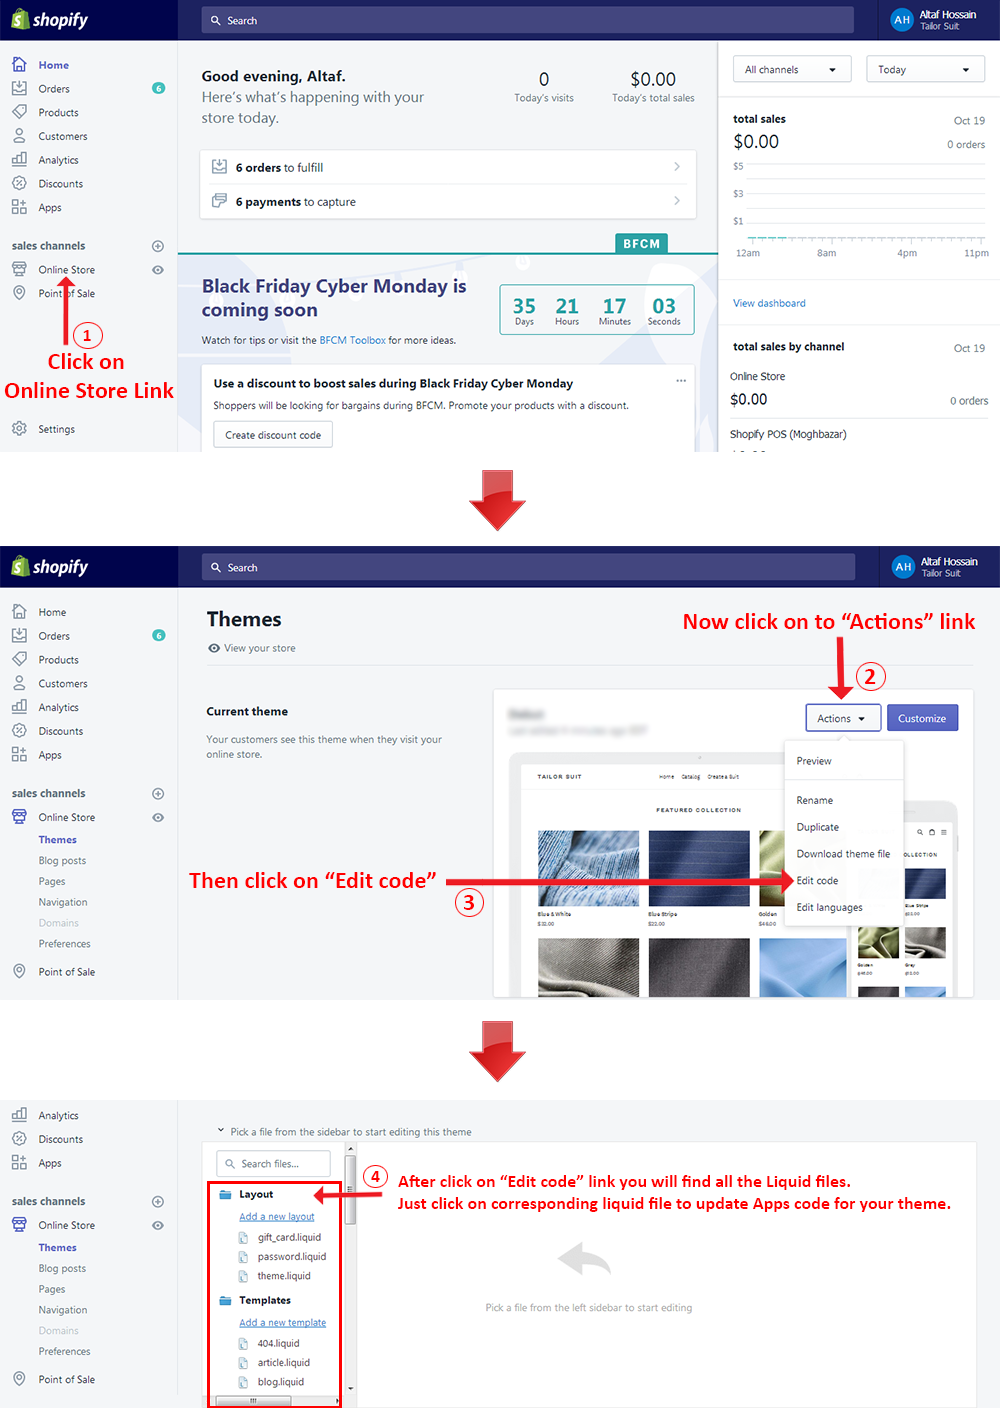
3. Go to "Themes" menu of Admin Dashboard and Edit your published themes to install the app. Follow the below steps to Edit your theme.
4. Now follow the below Steps and put the "Tailor Suit Shop" Apps Code in the following liquid files of Debut themes.
For manual installation go to sc-tsuit-btn-loader-150812.liquid file under the "Snippets" folder and change {% assign suit_install_type = 'auto' %} this code to {% assign suit_install_type = 'manual' %}.
Screenshots of theme file for the Step 1 code is given below:

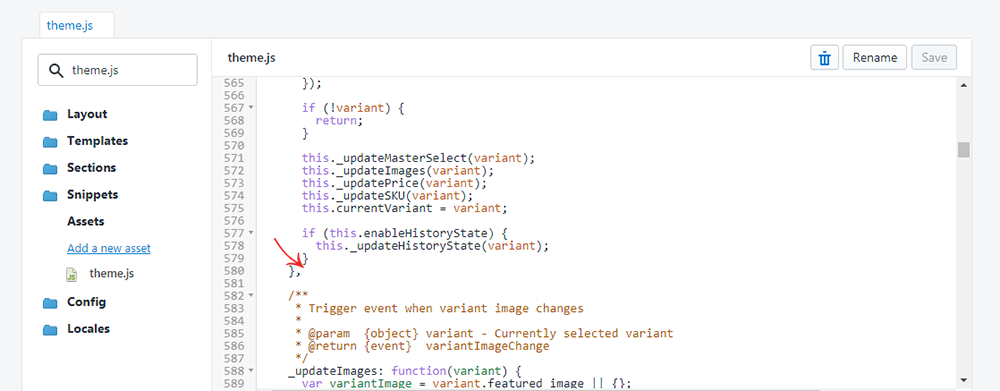
Go to theme.js file under the "Assets" folder and find the following location (after line number 579 approximate) like as below screenshot.
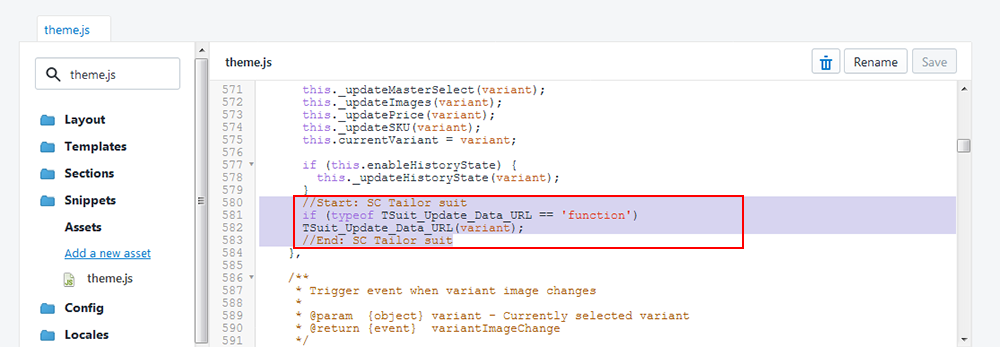
Now insert the following code to the theme.js files above mentioned location like as below screenshot.
	//Start: SC Tailor suit
	if (typeof TSuit_Update_Data_URL == 'function')
	TSuit_Update_Data_URL(variant);
	//End: SC Tailor suit
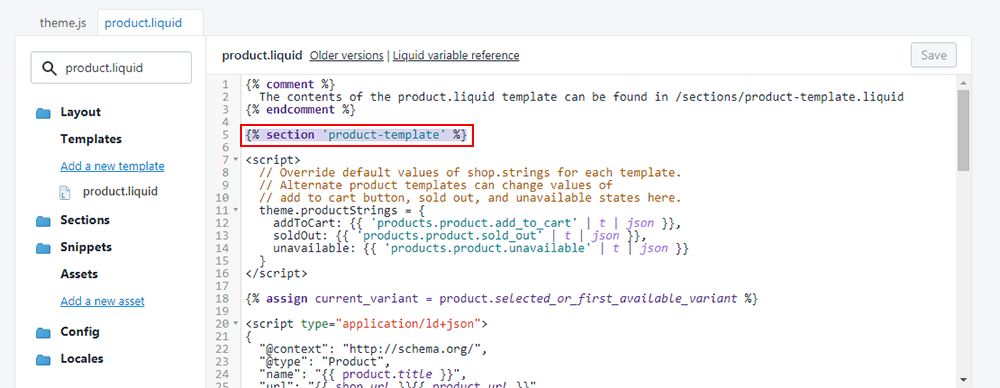
Go to product.liquid file under the "Templates" folder and find this code {% section 'product-template' %} in the following location like as below screenshot.
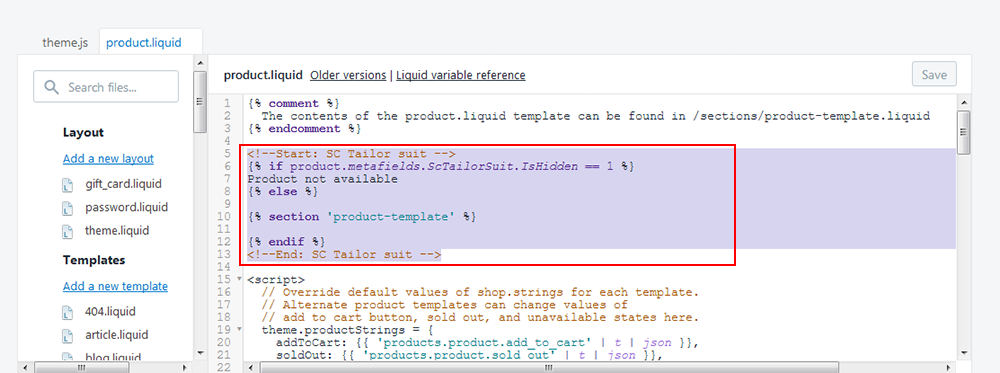
Now replace this code with the following codes like as below screenshot
<!--Start: SC Tailor suit -->
{% if product.metafields.ScTailorSuit.IsHidden == 1 %}
Product not available
{% else %}

{% section 'product-template' %}

{% endif %}
<!--End: SC Tailor suit -->
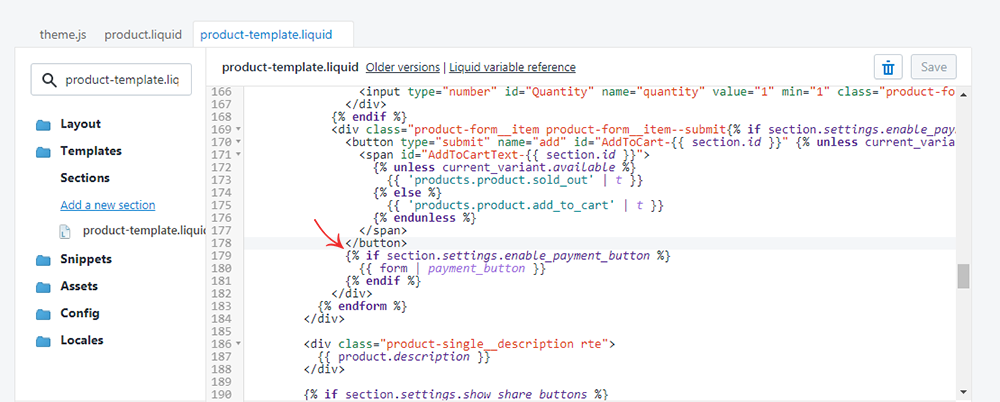
Go to product-template.liquid file under the "Sections" folder and find the following location (after "Add to Cart" button's code) like as below screenshot.
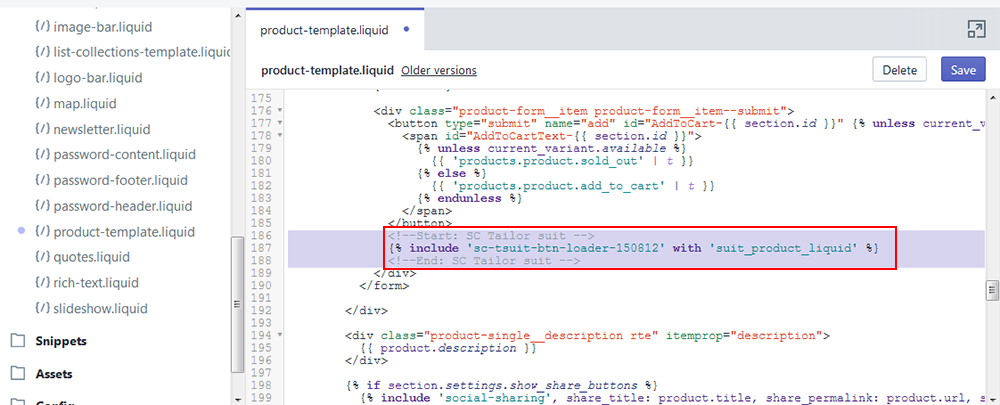
Now just copy the following code and insert it to the product-template.liquid files above mentioned location (after "Add to Cart" button's code) like as below screenshot.
	<!--Start: SC Tailor suit -->
	  {% include 'sc-tsuit-btn-loader-150812' with 'suit_product_liquid' %}
	<!--End: SC Tailor suit -->
Go to cart-template.liquid file under the "Sections" folder and find the following location like as below screenshot.
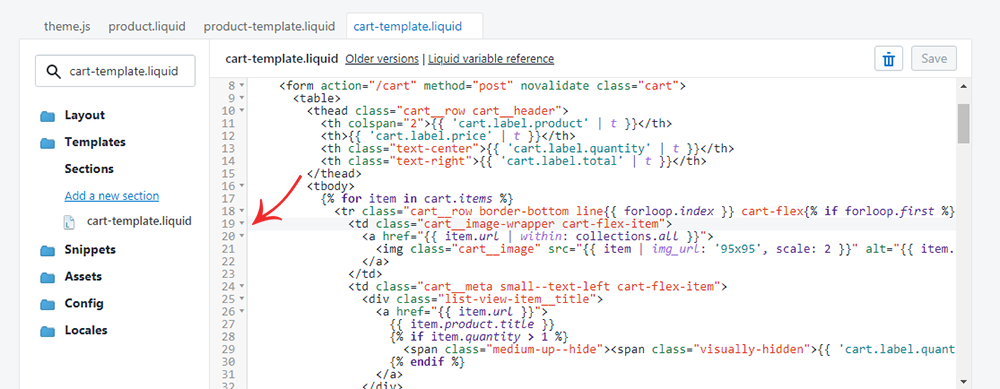
Now select the code of line number 19 to 73 (approximate) from cart-template.liquid files like as below screenshot.
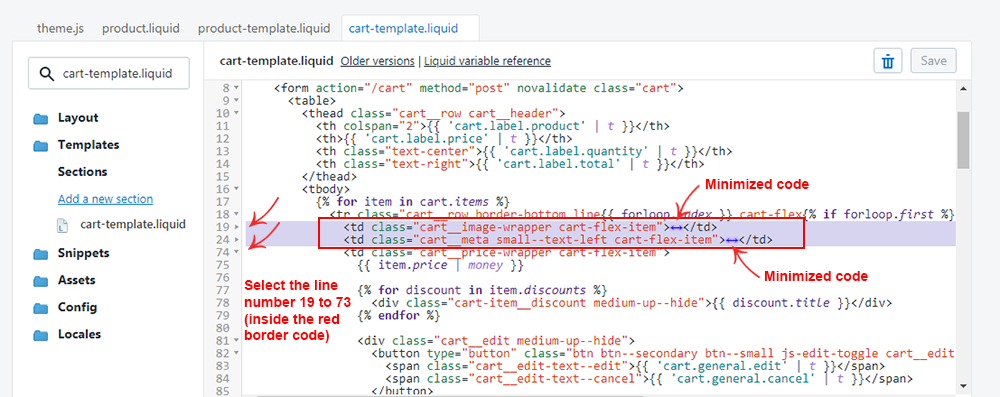
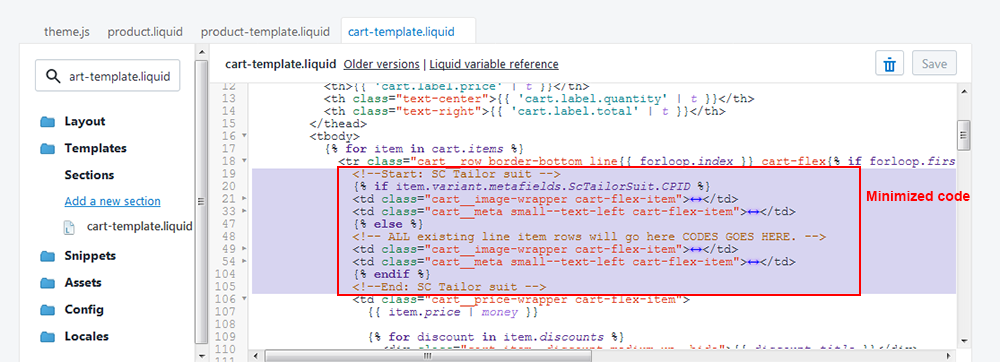
Now replace the selected codes with this following codes like as below screenshot.
<!--Start: SC Tailor suit -->
{% if item.variant.metafields.ScTailorSuit.CPID %}
<td class="cart__image-wrapper cart-flex-item">
{% if item.variant.metafields.ScTailorSuit.FrontImage %}
<a href="{{ item.variant.metafields.ScTailorSuit.FrontImage}}">
<img class="sc-cart-img" src="{{ item.variant.metafields.ScTailorSuit.FrontImage}}" style="width:100px;" alt="{{ item.title | escape }}" />
</a>
{% endif %}
{% if item.variant.metafields.ScTailorSuit.BackImage %}
<a href="{{ item.variant.metafields.ScTailorSuit.BackImage}}">
<img class="sc-cart-img" src="{{ item.variant.metafields.ScTailorSuit.BackImage}}" style="width:100px;" alt="{{ item.title | escape }}" />
</a>
{% endif %}
</td>
<td class="cart__meta small--text-left cart-flex-item">
<div class="list-view-item__title">
<a href="{{ item.variant.metafields.ScTailorSuit.Product_URL }}&ex_cp_id={{ item.variant.metafields.ScTailorSuit.CPID }}&ex_v_id={{ item.variant.id }}">
{{ item.title }}
{% if item.quantity > 1 %}
<span class="medium-up--hide"><span class="visually-hidden">{{ 'cart.label.quantity' | t }}</span>(x{{ item.quantity }})</span>
{% endif %}
</a>
</div>
<p class="small--hide">
<a href="/cart/change?line={{ forloop.index }}&quantity=0" class="btn btn--small btn--secondary cart__remove">{{ 'cart.general.remove' | t }}</a>
</p>
</td>
{% else %}
<!-- ALL existing line item rows will go here CODES GOES HERE. -->
<td class="cart__image-wrapper cart-flex-item">
<a href="{{ item.url | within: collections.all }}">
<img class="cart__image" src="{{ item | img_url: '95x95', scale: 2 }}" alt="{{ item.title | escape }}">
</a>
</td>
<td class="cart__meta small--text-left cart-flex-item">
<div class="list-view-item__title">
<a href="{{ item.url }}">
{{ item.product.title }}
{% if item.quantity > 1 %}
<span class="medium-up--hide"><span class="visually-hidden">{{ 'cart.label.quantity' | t }}</span>(x{{ item.quantity }})</span>
{% endif %}
</a>
</div>
{% unless item.variant.title contains 'Default' %}
<div class="cart__meta-text">
{% for option in item.product.options %}
{{ option }}: {{ item.variant.options[forloop.index0] }}<br/>
{% endfor %}
</div>
{% endunless %}
{% comment %}
Optional, loop through custom product line items if available
Line item properties come in as having two parts. The first part will be passed with the default form,
but p.last is the actual custom property and may be blank. If it is, don't show it.
For more info on line item properties, visit:
- http://docs.shopify.com/support/your-store/products/how-do-I-collect-additional-information-on-the-product-page-Like-for-a-monogram-engraving-or-customization
{% endcomment %}
{%- assign property_size = item.properties | size -%}
{% if property_size > 0 %}
<div class="cart__meta-text">
{% for p in item.properties %}
{% unless p.last == blank %}
{{ p.first }}:
{% comment %}
Check if there was an uploaded file associated
{% endcomment %}
{% if p.last contains '/uploads/' %}
<a href="{{ p.last }}">{{ p.last | split: '/' | last }}</a>
{% else %}
{{ p.last }}
{% endif %}
{% endunless %}
{% endfor %}
</div>
{% endif %}
<p class="small--hide">
<a href="/cart/change?line={{ forloop.index }}&quantity=0" class="btn btn--small btn--secondary cart__remove">{{ 'cart.general.remove' | t }}</a>
</p>
</td>
{% endif %}
<!--End: SC Tailor suit -->
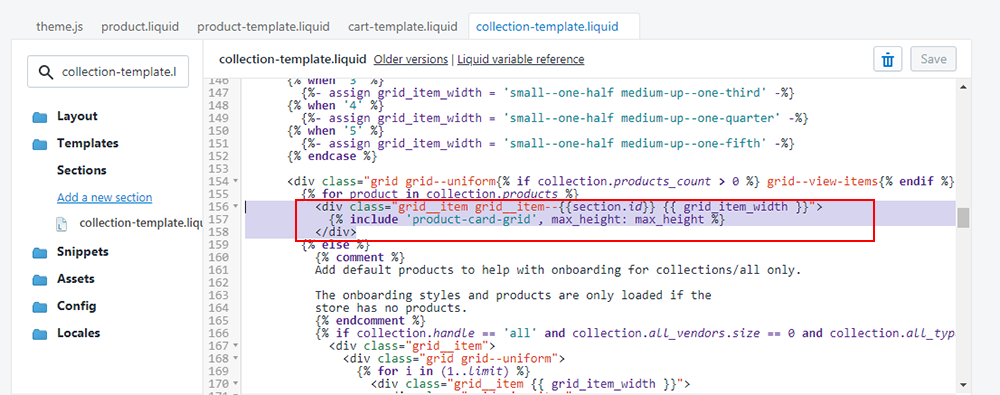
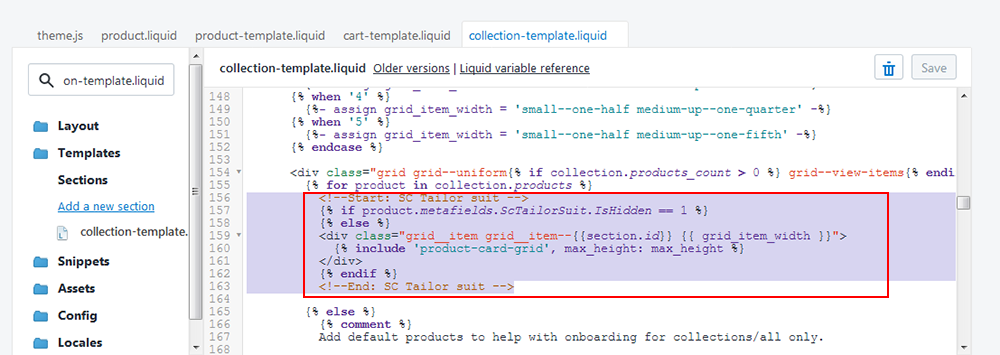
Go to collection-template.liquid file under the "Sections" folder and find the following location and select this three lines code like as below screenshot.
          <div class="grid__item grid__item--{{section.id}} {{ grid_item_width }}">
            {% include 'product-card-grid', max_height: max_height %}
          </div>
Now just replace this code with the following codes like as below screenshot
          <!--Start: SC Tailor suit -->
          {% if product.metafields.ScTailorSuit.IsHidden == 1 %}
          {% else %}
          <div class="grid__item grid__item--{{section.id}} {{ grid_item_width }}">
            {% include 'product-card-grid', max_height: max_height %}
          </div>
          {% endif %}
          <!--End: SC Tailor suit -->
Go to collection-template.liquid file under the "Sections" folder and find the following location and select this three lines code like as below screenshot.
<a href="{{ product.url | within: collection }}" class="list-view-item">
            {% include 'product-card-list', product: product %}
</a>
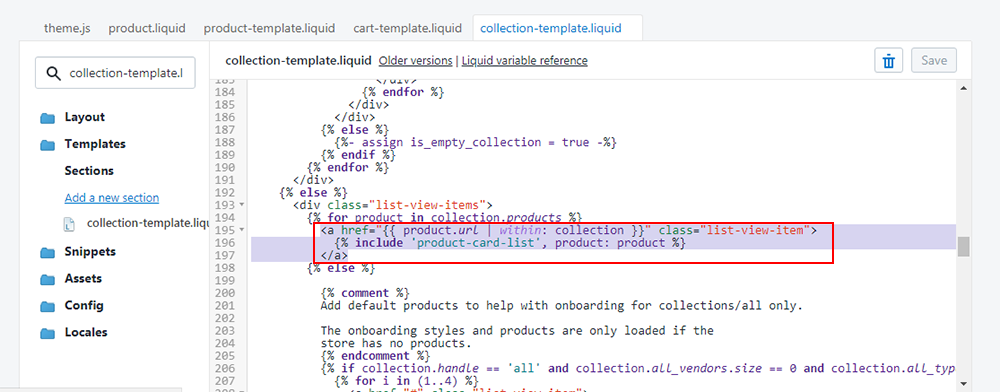
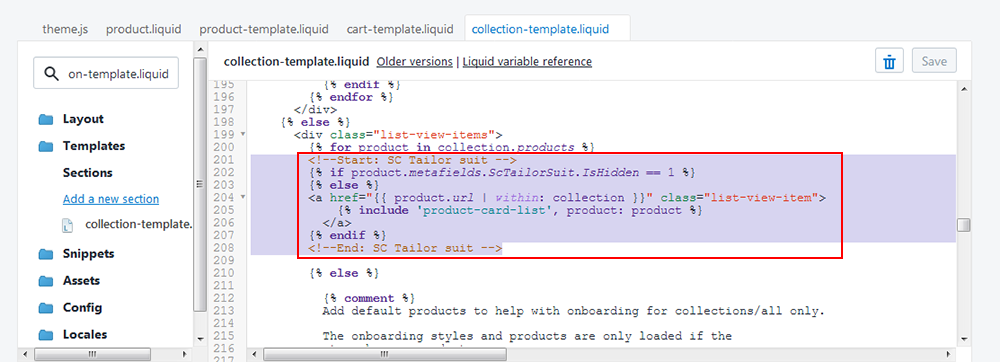
Now just replace this code with the following codes like as below screenshot
        <!--Start: SC Tailor suit -->
        {% if product.metafields.ScTailorSuit.IsHidden == 1 %}
        {% else %}
        <a href="{{ product.url | within: collection }}" class="list-view-item">
            {% include 'product-card-list', product: product %}
          </a>
        {% endif %}
        <!--End: SC Tailor suit -->
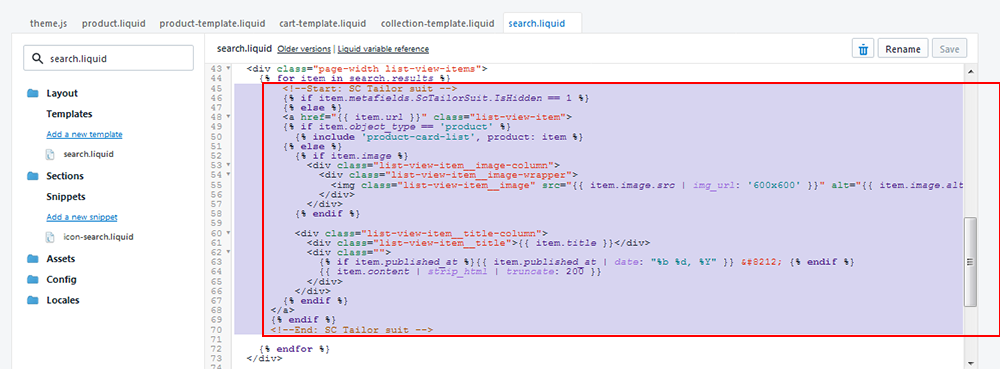
Go to search.liquid file under the "Templates" folder and find the following location and select the code between line number 45 to 65 (approximate) like as below screenshot.
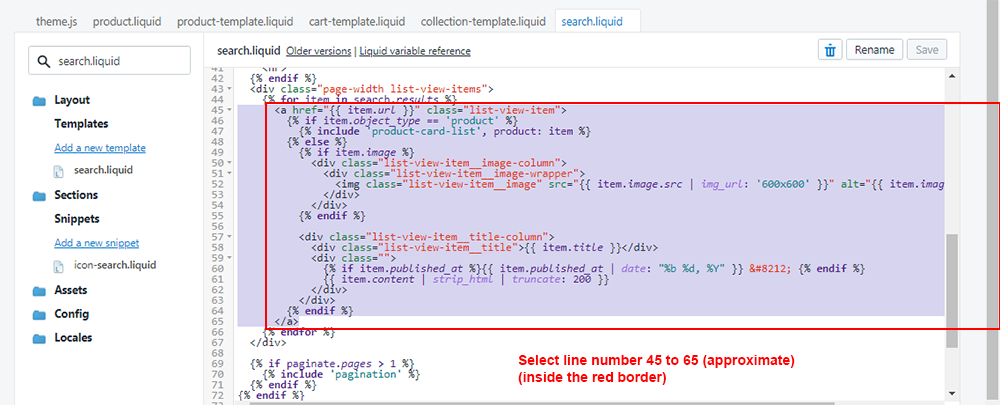
Now replace the selected codes with this following codes like as below screenshot.
<!--Start: SC Tailor suit -->
{% if item.metafields.ScTailorSuit.IsHidden == 1 %}
{% else %}
<a href="{{ item.url }}" class="list-view-item">
{% if item.object_type == 'product' %}
{% include 'product-card-list', product: item %}
{% else %}
{% if item.image %}
<div class="list-view-item__image-column">
<div class="list-view-item__image-wrapper">
<img class="list-view-item__image" src="{{ item.image.src | img_url: '600x600' }}" alt="{{ item.image.alt | escape }}">
</div>
</div>
{% endif %}
<div class="list-view-item__title-column">
<div class="list-view-item__title">{{ item.title }}</div>
<div class="">
{% if item.published_at %}{{ item.published_at | date: "%b %d, %Y" }} — {% endif %}
{{ item.content | strip_html | truncate: 200 }}
</div>
</div>
{% endif %}
</a>
{% endif %}
<!--End: SC Tailor suit -->
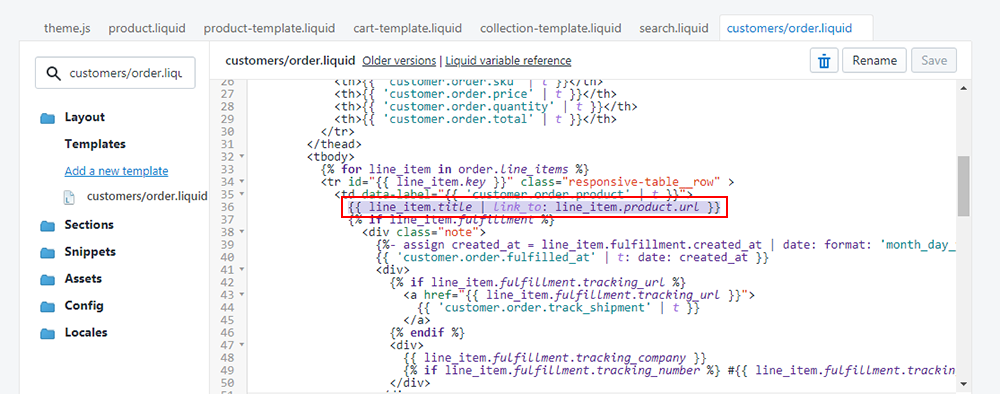
Go to customers/order.liquid file under the "Templates" folder and find the following location and select this code {{ line_item.title | link_to: line_item.product.url }} like as below screenshot.
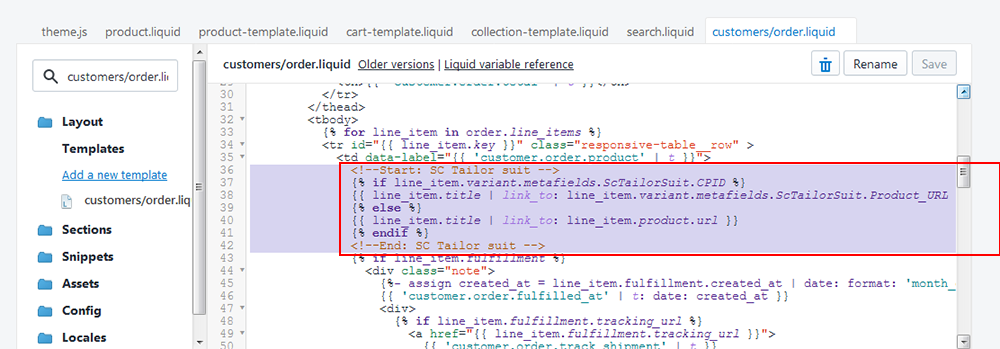
Now replace the selected code with this following codes like as below screenshot.
          <!--Start: SC Tailor suit -->
          {% if line_item.variant.metafields.ScTailorSuit.CPID %}
          {{ line_item.title | link_to: line_item.variant.metafields.ScTailorSuit.Product_URL }}
          {% else %}
          {{ line_item.title | link_to: line_item.product.url }}
          {% endif %}
          <!--End: SC Tailor suit -->
5. So your app has installed. Now go to "Apps" menu of Admin Dashboard and click on the "Tailor Shop Suit" App link.
6. Now customize "Make Suit Button", "Add to Cart Button", "Price Info" and "Measurement Unit" from "Settings" option. Advanced users can add custom CSS from this section.
7. Insert customization price for 2 piece or 3 piece suit and must be click on "Activate Suit" button from "Manage Products" option.
8. Now check it in the frontend.