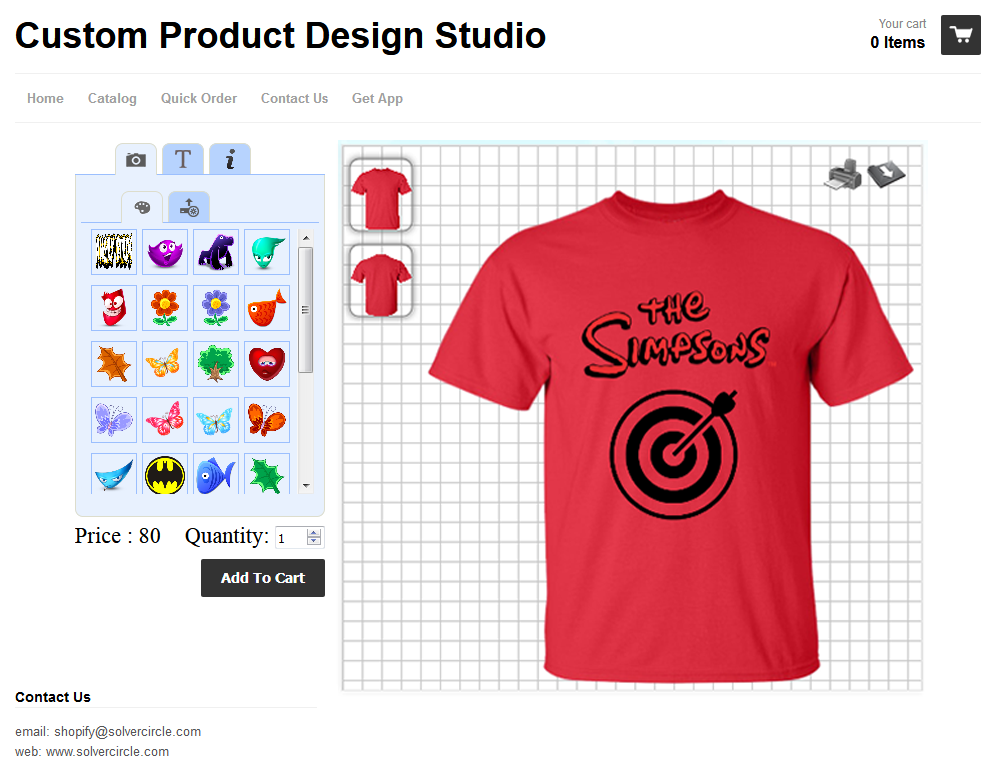
"Shopify Custom Product Design Studio" is a Shopify Apps which is used to Design or Personalized any Product such as T-Shirts, Hoodies, Jackets, Polo Shirts, Shirts, Tops, Pants, Shorts, Sportswear, Apron, Mugs, Bottles, Bags & Backpacks, Caps, Mobile-Tab-iPhone-iPad or other device Cases, Laptop or Notebook Cover, Apparel, Sandal, Shoe, Buttons etc.
By this Application customer can Design Product as per their need such as Add and Upload Clip-Art, Icon, Image, Logo on a Product, Add any Text with various font and design. Customer can “Add to Cart” Product with custom price.
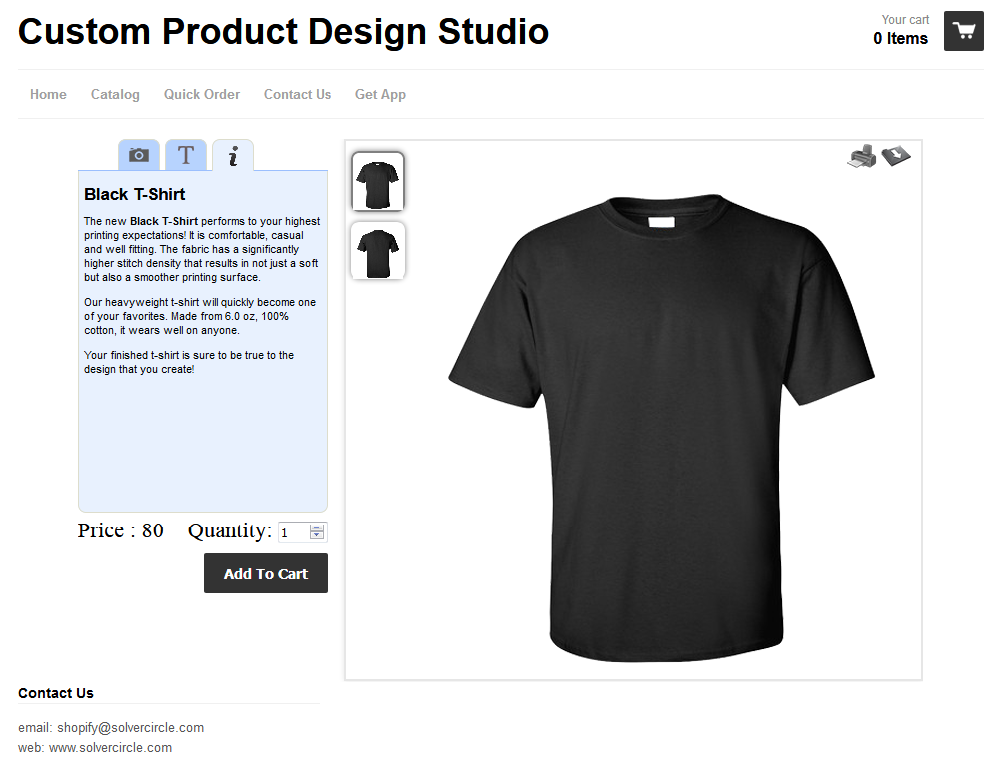
Customers are able to design their own Product and this is easy way to design from online. Just click a button and select or upload icon then add text to any position of the product.
"Shopify Custom Product Design Studio" application has some excellent features and easy to setup. "Shopify Custom Product Design Studio" application is more flexible and compatible with many existing application in the Shopify repository. This application is fully customizable. Users can easily configure the application into the new or existing Shopify Stores.
This app requires few theme liquid file changes. The changes depend on theme liquid codes. If you understand liquid logic / codes then follow the steps given below and let us know if you face any problems. Otherwise add install@solvercircle.com as a staff member of your store (If you don't know how to add "staff member" then click here) and email us at install@solvercircle.com, then we will install the codes for you.
1. Login your Shopify Store in Admin panel.
2. Now hit our App URL: https://apps.shopify.com/custom-product-design and click to "Get App" button.
For show this application in your theme, you should add some code in your template. So total process are given below…
3. Go to “Themes” menu of Admin Dashboard and Edit your published themes to install the application.
4. Click on “Template Editor” and put the Shopify Custom Product Design Application “Code” on the following files. (Update this template files: theme.liquid, product.liquid, cart.liquid, collection.liquid and index.liquid)
Step 1: Add the following code just before end of the "function (variant, selector)" function of product.liquid file (If the function does not exist in product.liquid file then find it in the theme.liquid file and put the code in same position as mentioned above). If you can't find it in either of those 2 files, then check in Snippets folder, because some theme placed this function in liquid file (like Apps.js.liquid, App.liquid etc) under snippets folder.
//Start: SC Custom Product Design
if (typeof CP_Update_Data_URL == 'function')
CP_Update_Data_URL(variant);
//End: SC Custom Product Design
Screenshots of theme file for the Step 1 code is given below:

Step 2(a): Update product.liquid file: Add the following code at very begining of the product.liquid file.
{% if product.metafields.CustomProductDesign.IsHidden == 1 %}
Product not available
{% else %}
Now add the following code at bottom of the product.liquid file.
{% endif %}
Step 2(b): Add the following code just after “Add to Cart” button code. Please check the screenshot below. If you can't find 'Add to Cart' button code in product.liquid then check under Snippets folder. Some themes add product page content under liquid file (like product-form.liquid etc.) in Snippets folder.
<!--Start: SC Custom Product Design -->
{% include 'sc-cp-btn-loader-150812' %}
<!--End: SC Custom Product Design -->
Screenshots of theme file for the Step 2 code is given below:

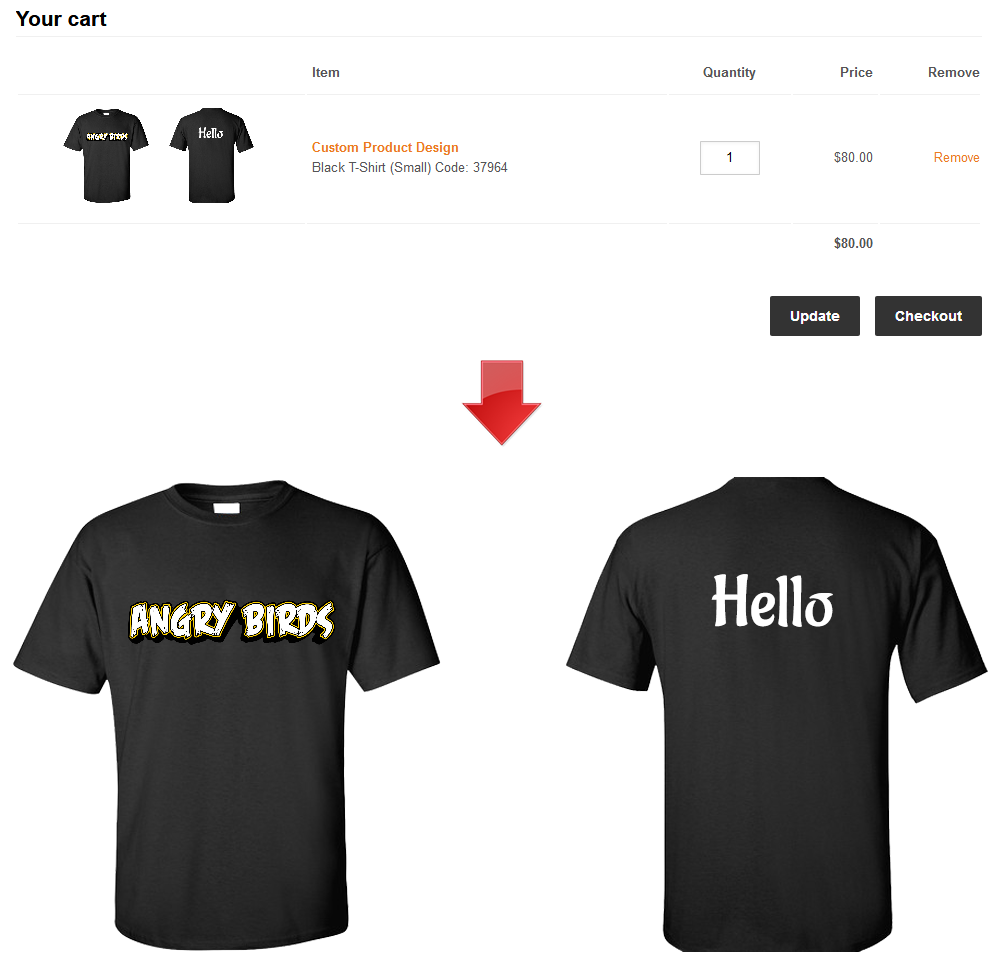
Step 3: cart.liquid Changes: This change is a bit critical. Some themes use table format to show the items in the cart, some use div, here we are giving example for a theme which is using table format. The logic is: For each item in the cart we need to check if the item is a customized product, if yes then we need to use different image url and different product page url. So, we need a if else block under the for loop, in else block we need to use the existing theme codes and in if block we need to use different image url and product page url using existing theme code for the cart item. Sample code for table format is given below:
	<tbody>
				{% for item in cart.items %}
	<!--SC Custom Product Design -->
				{% if item.variant.metafields.CustomProductDesign.CPID %}
				<tr>
				  <td class="image">
					<div class="product_image">
					  {% if item.variant.metafields.CustomProductDesign.FrontImage %}
					  <a href="{{ item.variant.metafields.CustomProductDesign.FrontImage}}" target="_blank">
						<img class="sc-cart-img" src="{{ item.variant.metafields.CustomProductDesign.FrontImage}}"

	style="width:100px;"  alt="{{ item.title | escape }}" />
					  </a>
					  {% endif %}
					  {% if item.variant.metafields.CustomProductDesign.BackImage %}
					  <a href="{{ item.variant.metafields.CustomProductDesign.BackImage}}" target="_blank">
						<img class="sc-cart-img" src="{{ item.variant.metafields.CustomProductDesign.BackImage}}"

	style="width:100px;"  alt="{{ item.title | escape }}" />
					  </a>
					  {% endif %}
					</div>
				  </td>
				  <td class="item">
					<a href="{{ item.variant.metafields.CustomProductDesign.Product_URL }}&ex_cp_id={{ item.variant.metafields.CustomProductDesign.CPID }}&ex_v_id={{ item.variant.id }}">
					  <strong>{{ item.title }}</strong>
					</a>
				  </td>
				  <td class="qty">
					<input type="text" size="4" name="updates[]" id="updates_{{ item.id }}" value="{{

	item.quantity }}" onfocus="this.select();" class="tc item-quantity" />
				  </td>
				  <td class="price">{{ item.line_price | money }}</td>
				  <td class="remove"><a href="/cart/change?line={{ forloop.index }}&quantity=0"

	class="cart">Remove</a></td>
				</tr>
				  {% else %}
		<!-- ALL existing line item rows will go here CODES GOES HERE. -->
	{% endif %}

				{% endfor %}
Step 4: collection.liquid, index.liquid, search.liquid changes: Please check for a for-loop which is used to show a product details. If you can't find the for-loop for product details, then look for include statement and check the file (mentioned in include statement) under Snippets / Assets folder which should contain the for-loop for the product list. Place all the codes inside the for-loop under a if else statement. if block will be empty, you need to copy all the for-loop content under else block:
	<!--SC Custom Product Design -->
	{% if product.metafields.CustomProductDesign.IsHidden == 1 %}
	{% else %}
	{% include 'product-loop' with collection.handle %}
	{% endif %}
Screenshots of theme file for the Step 4 code is given below:

Step 5: customers/order.liquid changes: Insert the following code into the "line_item" for loop condition of customers/order.liquid files.
	<!--SC Custom Product Design -->
	{% if line_item.variant.metafields.CustomProductDesign.CPID %}
	{{ line_item.title | link_to: line_item.variant.metafields.CustomProductDesign.Product_URL }}
	{% else %}
	{{ line_item.title | link_to: line_item.product.url }}
	{% endif %}
Screenshots of theme file for the Step 5 code is given below:

Step 6: (a) if you assign "product type" in your products then you should add the following "if condition" codes in your theme's liquid file:
	<!--SC Custom Product Design -->
	{% if(type != 'CUSTOM_DESIGN_HIDDEN_IMPORTANT' and type != 'CUSTOM_DESIGN_HIDDEN_TEMPORARY' %}
				<li {% if forloop.index > 8 %} class="sidebar-module__hidden-item"{% endif %}>{{ type | link_to_type }}</li>
				{% if forloop.index > 8 %}
				  {% assign viewmoreTypes = true %}
			  {% endif %}
			{% endif %}
Screenshot of theme file for the Step 6 (a) code is given below:

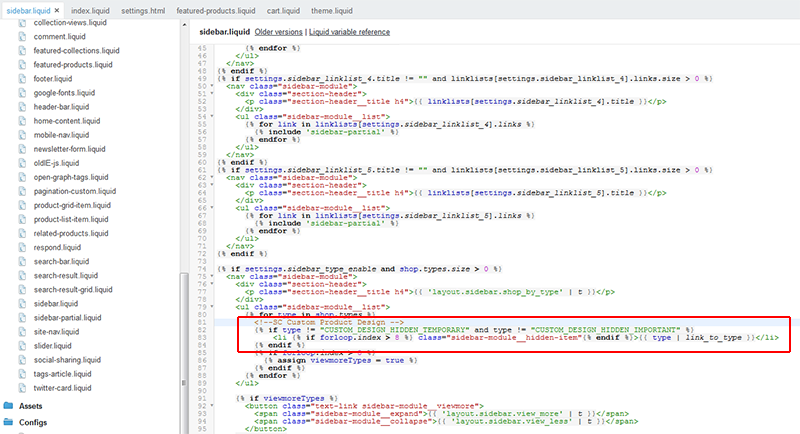
Step 6: (b) And if the "product type" shows in your sidebar.liquid file then you should add the following code in your sidebar.liquid file:
	<!--SC Custom Product Design -->
		   {% if type != "CUSTOM_DESIGN_HIDDEN_TEMPORARY" and type != "CUSTOM_DESIGN_HIDDEN_IMPORTANT" %}
			 <li {% if forloop.index > 8 %} class="sidebar-module__hidden-item"{% endif %}>{{ type | link_to_type }}</li>
	  {% endif %}
Screenshot of theme file for the Step 6 (b) code is given below:
Step 7: Add the following code in the end of your theme.liquid file (before the body tag)
	<!--SC Custom Product Design -->
	  <style type="text/css">
	  .sc-cart-img
	  {
		width:100px !important;
	  }
	  </style>
Screenshot of theme file for the Step 7 code is given below:

5. So your application has installed. Now go to “Apps” menu of Admin Dashboard and click on the “Custom Product Design” Apps link.
6. Now click on “Appearance Settings” menu in the right top corner to customize your Design Toolbox.
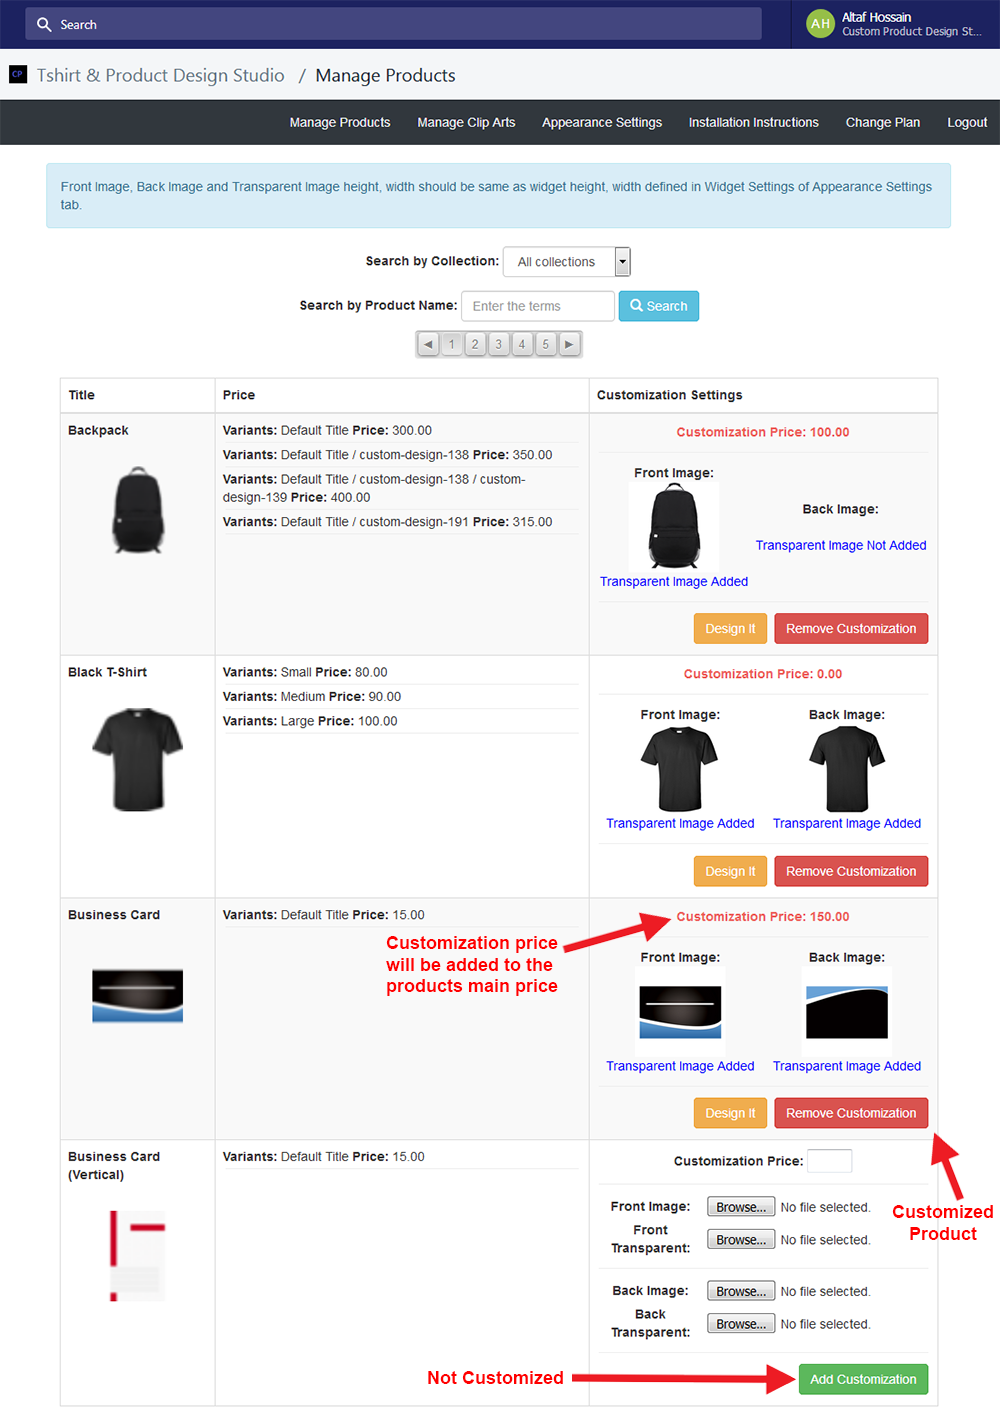
7. Go to the next tab “Manage Product.” Here you will see all the product. In the right side you will find “Customization Settings” options. Just set the “Customization Price” and Upload Front and Back Image or only front image to show on the Frontend Design view.
8. Now go to “Manage Logos” menu. Click on “Add Files” link and select Image/Icon/Clip-Art files. You can select single or multiple items. After select files, click on the “Start Upload” button and all items will be upload simultaneously. You can “Cancel Upload” and Delete single/selected/all items at a time from this panel.
9. For more Information or Documentation go to “Help” menu.